Introduction
A pillow block bearing — also called a plumber block or mounted bearing — is a self-contained bearing unit that bolts directly to a machine frame or foundation. The bearing is pre-assembled inside a cast iron or pressed steel housing, ready to support a rotating shaft. While pillow blocks are designed for simplicity, incorrect installation is the #1 cause of premature failure. This step-by-step guide covers everything from shaft inspection to final alignment verification.
What Is a Pillow Block Bearing?
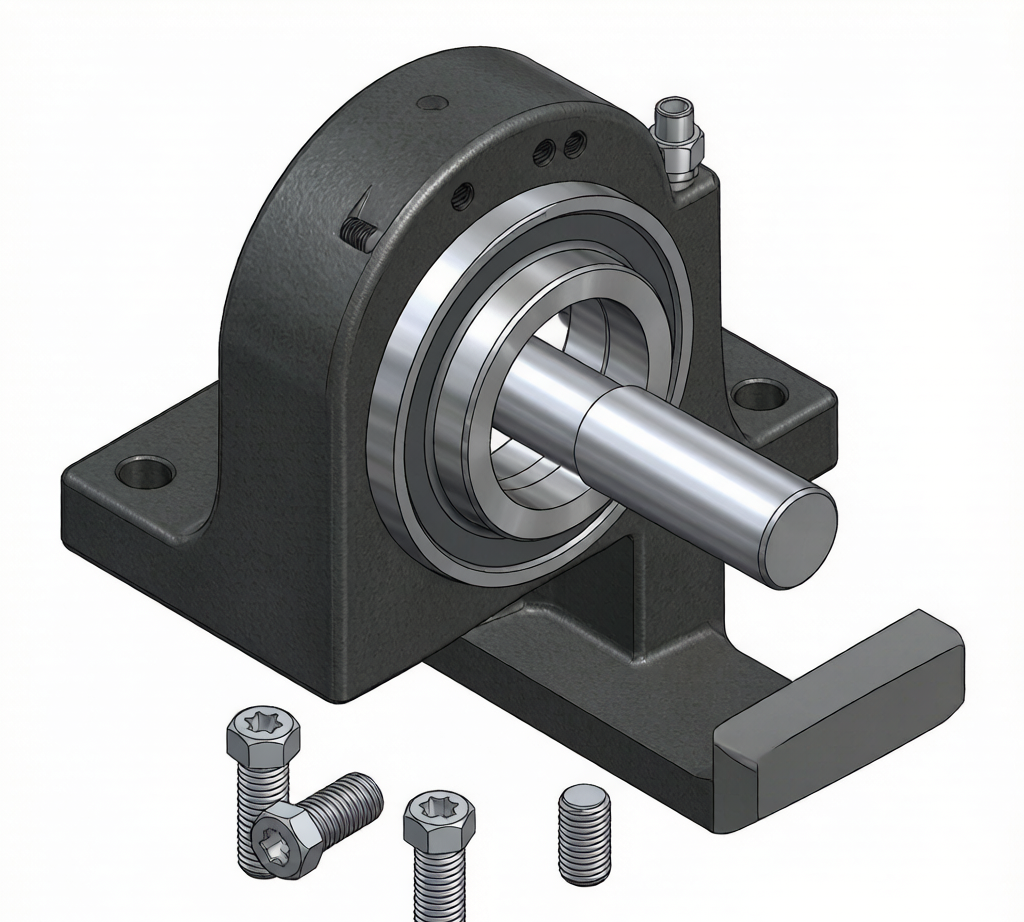
A pillow block consists of three main components:
- Housing — typically cast iron (FC200/GG20) or pressed steel, with two bolt holes for mounting. The housing base is machined flat for stable mounting.
- Bearing insert — usually a self-aligning deep groove ball bearing (UC series) or spherical roller bearing with an extended inner ring and set-screw or eccentric locking collar.
- Sealing system — the housing includes integrated lip seals or labyrinth seals to retain grease and exclude contaminants.
The self-aligning feature (typically ±2-3°) makes pillow blocks forgiving of minor frame imperfections — but you still need to get the basics right.
Pre-Installation Checklist
Before you pick up a wrench, verify these items:
- Shaft diameter and tolerance — measure the shaft at the bearing seat with a micrometer. For UC-series bearings, the shaft should be h7 to h9 tolerance. An undersized shaft allows inner ring creep; an oversized shaft causes excessive interference and reduces internal clearance.
- Shaft surface finish — Ra 0.8-1.6 μm (32-63 micro-inch). A rough shaft surface will wear the bore of the inner ring.
- Mounting surface flatness — check the foundation or frame with a straightedge. The mounting pads should be flat within 0.1mm over the bearing footprint.
- Bearing is the correct orientation — the grease nipple should be accessible after mounting. On split housings, the joint line should be perpendicular to the load direction.
- Cleanliness — remove all debris, welding spatter, and paint overspray from the mounting area.
Step-by-Step Installation Procedure
Step 1: Slide the Bearing onto the Shaft
Clean the shaft with a lint-free cloth and apply a thin film of light oil. Slide the bearing onto the shaft by hand if possible. If interference requires force, use a mounting sleeve against the inner ring only — never press on the outer ring or housing — this will brinell the raceway.
For adapter-sleeve mounted pillow blocks (SNL/SNH type housings with spherical roller bearings), slide the adapter sleeve onto the shaft first, then the bearing, then tighten the lock nut to the specified reduction in radial clearance.
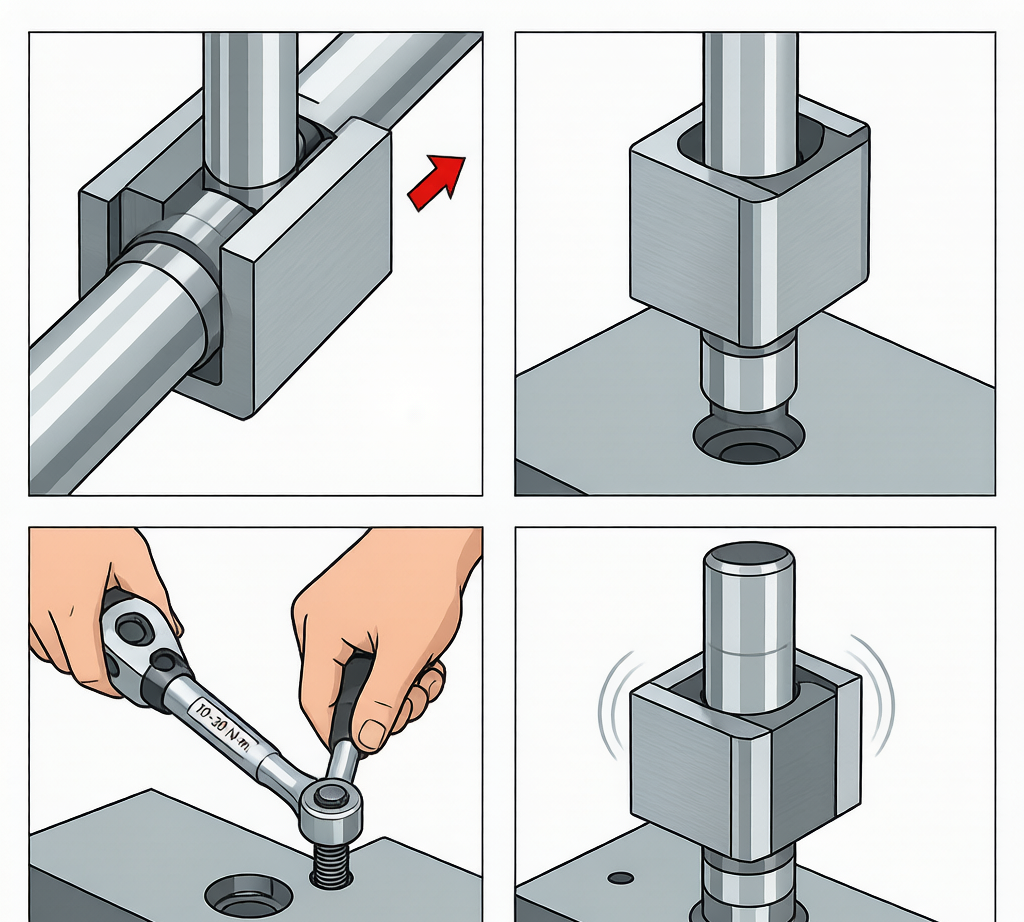
Step 2: Position and Align
Position the pillow block at the intended shaft location. The shaft should pass through the center of the housing bore without contacting the seals on either side. Use a feeler gauge to verify equal clearance around the shaft at both seal openings — this confirms there’s no angular misalignment.
Step 3: Tighten Bolts (Stage 1 — Snug, Not Tight)
Insert the mounting bolts with flat washers and snug them finger-tight. Do not fully tighten yet — the bearing needs to self-align when the shaft rotates.
Step 4: Rotate the Shaft to Self-Align
Rotate the shaft by hand through several full revolutions. This allows the bearing’s self-aligning feature to find its natural position relative to the shaft. You may feel the housing shift slightly — this is normal and desired.
Step 5: Tighten Set Screws or Locking Collar
For UC-series pillow blocks with set screws: tighten the two set screws in sequence — first screw to half torque, second screw to full torque, then back to the first screw for full torque. This ensures the inner ring seats evenly. Typical torque values: M6 = 5 Nm, M8 = 12 Nm, M10 = 24 Nm, M12 = 40 Nm.
For eccentric locking collar: rotate the collar in the direction of shaft rotation, then tighten the set screw on the collar.
Step 6: Final Bolt Tightening
Now fully tighten the mounting bolts to the recommended torque. For M12 bolts in a cast iron pillow block, this is typically 50-60 Nm. Use a calibrated torque wrench — do not guess.
Step 7: Final Check — Free Rotation
Rotate the shaft by hand. It should turn smoothly with consistent, light resistance. Any tight spots or pulsing resistance indicates misalignment, housing distortion, or a contaminated bearing. Do not accept a bearing that doesn’t rotate freely — it will overheat and fail prematurely.
Common Installation Mistakes
- Overtightening set screws — this deforms the inner ring and creates high spots. Use a torque wrench, not an impact driver.
- Tightening bolts before set screws — this locks in misalignment before the bearing can self-align.
- Hammering the housing to “adjust” position — cast iron is brittle and can crack. If the position is wrong, loosen the bolts and reposition correctly.
- Mounting on uneven surfaces without shims — the housing will distort, reducing internal clearance and causing overheating. Use stainless steel shims to level the mounting pads.
Troubleshooting After Installation
| Symptom | Likely Cause | Corrective Action |
|---|---|---|
| Excessive noise (high pitch) | Insufficient grease, or grease has not distributed | Add grease; run at reduced speed for 30 min, then recheck |
| Overheating (>40°C rise) | Too much grease, or housing distortion from uneven mounting | Purge excess grease; loosen bolts, re-tighten evenly |
| Vibration (1× rotational frequency) | Shaft unbalance or bent shaft | Balance shaft; check runout with dial indicator |
| Grease leaking from seals | Over-greasing or seal damage during installation | Reduce grease quantity; inspect seals for cuts/damage |
Conclusion
Pillow block bearings are designed for simplicity, but the difference between a 10-year bearing and a 3-month failure often comes down to installation discipline: measure the shaft, tighten in the right sequence, verify free rotation, and document the torque values. Boret supplies UC-series pillow blocks in both cast iron and stainless steel housings — contact us for mounting recommendations specific to your shaft size and application.